The mechanism that is used to determine which server is handling the service at that time, is called leasing.
There are 2 types of leasing:
1
Consensus; This means that the information on which server is handling the service, is maintained in-memory. You MUST use associate your managed servers to nodemanagers in this situation, because the nodemanagers are responsible for monitoring the health and initiating fail-overs.
2
Database; In this case, the leasing information is stored in a database table (ACTIVE). Of course, you are creating a dependency on the database here, for a failover service! So, it makes a lot of sense to use this scenario only if your database implementation itself is High Available (RAC).
When the leasing method is in place, we need to create the jms servers.
The jms servers need to be targeted to Migratable Targets. These enable to 'take over' the service from the failed managed server.
In order to successfully take over the service, the managed server which has taken over the service, must have access to the persistent store of the server that has failed. This implies that this persistent store must be
a: located on a shared filesystem (file based persistent store), in case the servers reside on different machines, or
b: located on a database (jdbc bases persistent store) to which all servers have access
In this example, we are going to use database leasing and set up jms service failover with jdbc bases persistent stores.
Step 1: Create the leasing table
Oracle provides a script to create the table for different sorts of databases. The scripts are called leasing.ddl and are located in $WL_HOME/server/db/<db_vendor>/leasing.ddl
For oracle databases the ddl reads:
DROP TABLE ACTIVE;
CREATE TABLE ACTIVE (
SERVER VARCHAR2(150) NOT NULL,
INSTANCE VARCHAR2(100) NOT NULL,
DOMAINNAME VARCHAR2(50) NOT NULL,
CLUSTERNAME VARCHAR2(50) NOT NULL,
TIMEOUT DATE,
PRIMARY KEY (SERVER, DOMAINNAME, CLUSTERNAME)
);
Create this table in the database.
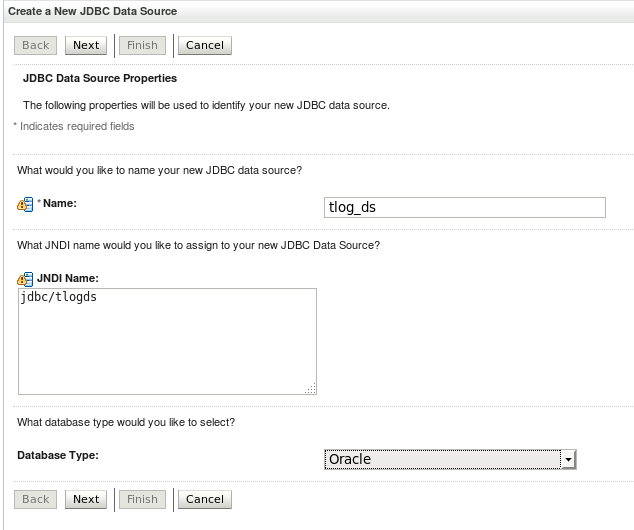
Step 2: Create a leasing datasource
Create a datasource, using the credentials which you used to create the ACTIVE table in step 1
Target the datasource to the cluster.
Step 3: Configure Migration in the cluster
Select your cluster and go to Configuration > Migration.
Select Database for Migration Basis
Select the datasource that you created in step 2
Note that you can change the name of the table in Auto Migration Table Name. This has to correspond with the name used in the leasing.ddl script!

Save and activate your changes and restart the cluster.
Step 4: Create a persistent store datasource
Create a datasource which uses a NON_XA driver and does NOT Support Global Transactions. This datasource is going to be used by the persistent stores.
Target the datasource to the cluster.
Step 5: Create persistent stores
Go to Services > Persistent Stores
For each mirgratable target to which you are going to target a jms server, create a Persistent Store.
The prefix name is used to prepend the tablename in the database.

Step 6: Create jms servers
Go to Services > Messaging > JMS Servers and create a JMS Server for each Migratable Target.

Assign the Persistent Stores we created in step 5 to each new JMS Server.
In the targetting screen, select the Migratable Target! Not the Managed Server:

Save and activate your changes.
You will now see all JMS Servers, along with their persistent stores and targetted migratable servers in the summary.
Step 7: Enable JMS Service Migration
For each Migratable Target, select the Migratable Target and go to Configuration > Migration
Select Auto-Migrate Failure Recovery Services
Select all candidate servers that can be used.
Note that the User Preferred Server itself must also be in the list of Candidate servers!

Finally, restart the cluster as well as the admin server.
You now have implemented JMS Service failover!